
 Peeling off the runner plastic. Way easier than putting it on (the first time at least). It´s like peeling a banana :)
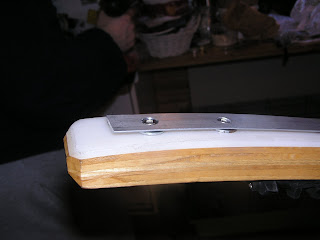
 First step over - that was easy done. See the edge of the runner plastic sticking out of the runner on the right side? That´s where the screws broke off.
 Peeling off the last pice on the second runner. The aluminum rail sticking out where the screws broke, is well visible on this picture as well (on the further runner).
PHASE 3: (my personal favourite)


 Make sure the screws you are using are stainless-steal. The only problem you may run into is that the screw heads have a 3mm square shape profile, which is not a standard one in Europe, so you probably won´t find a corresponding bit in your workshop. But after a bit of running around town, we found them in hardware store called Gardin & Persson.
And here it comes (drumrolls please):
PHASE NR.4 - Pulling runner plastic over the rails


This one´s for you, Richard! :) Do you see how I, singlehandedly pulled the plastic over the rail? And how I (alone) have used just my thumbs to push the last few centimeters on?
YES! It was that easy! We could do this for living! :) LOL
Thank you Rikke for the suggestion of using the underlayes. Now we´ll just have to see how it all works in reality!
And the moral of the story? Fellow musher and friend Karsten told me, when I mentioned I felt like an idiot and should have asked someone else to mount the QCR system on our sleds: "If you didn´t have to go through this, you would have missed the learning process. And you can´t graduate from rookies to masters. Next time you can give advise on this to someone else." -- But that will take a few more runners to work on, I guess! :)
So may our experience and this log help other QCR rookies in their struggle!


4 comments:
LOL!! There is a hard way and a easy way to do all things I suppose, but the possitive thing is that my triceps got a nice work-out the first time! :)
the above note is from me , Richard, for those who didn´t know :)
Good it went easier this time-
Per Olav got boxes of those bits that goes with the screws and allways sent one to those ordering rails...
BUT I see a little mistake you have done- the last screw shoud sit as close to the end of the ski as possible, and then cut of the end of rail. When its some cmtrs behind the rail and end of ski this can bend....
one more thing...
when changing plastic have a flat screwdriver in hand to drag along under the rail to remove ice and snow before putting new plastic on. With the *skiver* under the rail it also get more space for ice...
Post a Comment